How do I use Mail Merge in the Mac version of TaxCalc?
Mail Merge allows you to export client data into Microsoft Word documents, including letters and forms. You can access Mail Merge via Practice Manager.
The following process shows you the basic steps on how to use Mail Merge on a Mac. The steps are slightly different if you are using the 2011 or 2016 version of Office for Mac
When using Office 2011
When using Office 2016
Office 2011
- Open Practice Manager from the home screen.
- Click on Mail Merge from the left-hand menu. To start with you'll see the standard filter (All Clients) but you can create custom filters later.
- Click on Create New Mail Merge to open the wizard and click Continue.
- Fill in the Name and Description fields for the Mail Merge and click Continue.
- Select the tax year and one of All Clients, Specific clients or Advanced client selection (Data mine).
- Select your clients and click Continue.
- Check that the summary of clients is correct and click Continue.
- Select a template from the list and click on Use Template.
- In the Microsoft Word template, edit any sections highlighted in yellow.
- You'll also see the Use Template window.
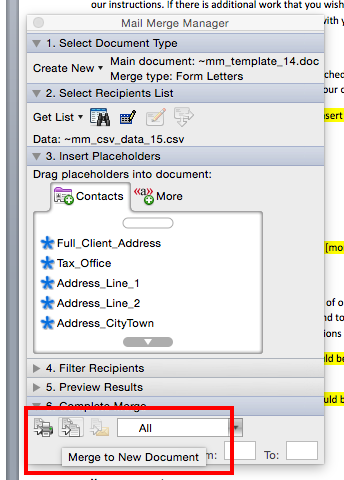
- On the Word menu bar, go to Tools > Mail Merge Manager.
- Click on 6. Complete Merge at the bottom of Mail Merge Manager.
- Select Merge to Printer (to open the print window) or Merge to New Document (to show the merged document on screen).
PLEASE NOTE: If you want to save a list of clients for frequent use, click on Finish & Save on the finish screen.
Office 2016
- Open Practice Manager from the home screen.
- Click on Mail Merge from the left-hand menu. To start with you'll see the standard filter (All Clients) but you can create custom filters later.
- Click on Create New Mail Merge to open the wizard and click Continue.
- Fill in the Name and Description fields for the Mail Merge and click Continue.
- Select the tax year and one of All Clients, Specific clients or Advanced client selection (Data mine).
- Select your clients and click Continue.
- Check that the summary of clients is correct and click Continue.
- Select a template from the list and click on Use Template.
|
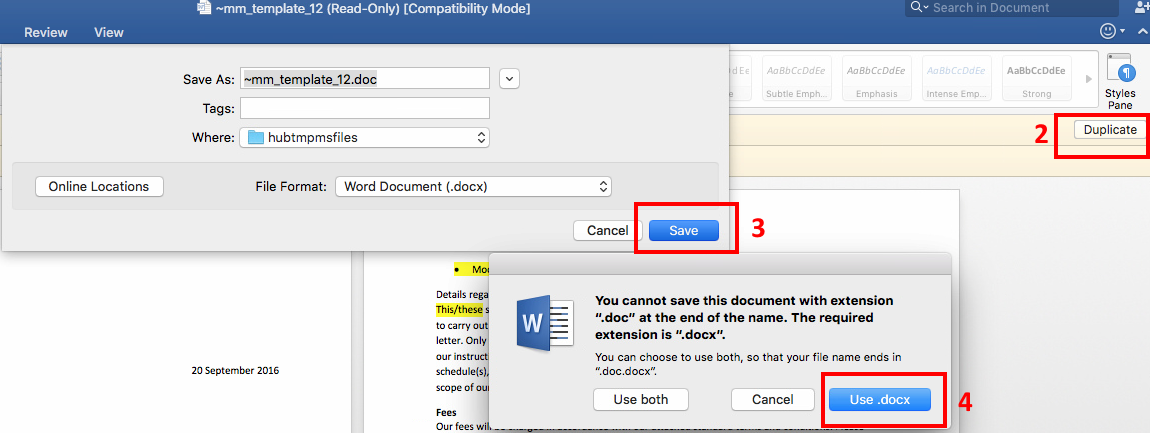
Please note; At this stage some users may get prompted for additional permissions. If this is the case...
- Click Select when prompted, then Grant Access.
- Select the Duplicate button when it prompts that the document is read only (shown on the yellow ribbon underneath the main toolbar).
- Select Save (do not change anything else at this point).
- Choose use .docx
- Continue to Step 9.
|
- In the Microsoft Word template, edit any sections highlighted in yellow.
- Select Mailings from the Menu bar.

- From here you can finalise your mail merge document.
- Preview the results of the merge.
- Insert other mail merge fields.
- Edit the recipient list.
- Once you have ensured the report will display the way it is requires, select Finish and merge to complete the mail merge.
PLEASE NOTE: If you want to save a list of clients for frequent use, click on Finish & Save on the finish screen.
